How to improve apparel product pictures: more photos for more sales
There’s a distance to shopping online that’s difficult to get around. Customers can’t hold the products and judge feel, fit, and style as simply as they can in a brick-and-mortar store. Your job as an e-commerce store owner is to reduce that distance.
The most effective way is to show your customer as many high quality product images as possible. According to eBay, each additional product image added to a listing increases conversion rates by 2%. That means adding 10 images can increase conversions by 20%. That’s huge!
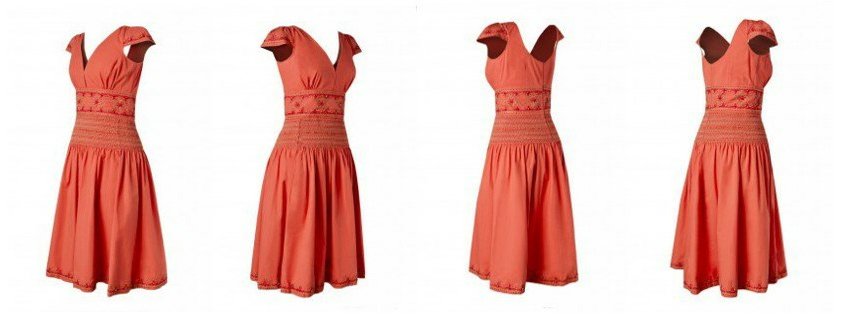
You don’t want to simply upload variants of the same image over and over. The idea is to use different angles to show your customer the product as many different ways as possible, and leave no doubt in their mind about the product they will be receiving. In short, make them trust you.
![]()
One useful way to showcase fit is the invisible mannequin technique, also known as ghosting. It’s a three dimensional effect applied in post-production that lets you show fit without the expense of models. This ghost mannequin photography guide will walk you through how to create the effect.
Here are our recommended photo angles to include in product photos for apparel.
Recommended perspectives for apparel
1. Front and back (2 photos)
![]()
2. 45-Degree angles (4 photos)
![]()
3. Left and right sides (2 photos)
![]()
4. Details (2-4 photos, as needed)
![]()
Those are useful, right? None of the photos felt forced, and all of them provide valuable information to the customer. It’s as close as you can get to the customer trying a dress on and twirling in front of a mirror, short of using video. That’s why more product images lead to more sales.
Post-Production Processing
Once you’ve got your 10-12 shots (or more!), you need to think about how you will present them on your website. You have shots taken from different angles that may have different camera settings, especially when it comes to detail shots.
Post-production processing is the step in your workflow that assures quality. You should strive for consistent alignment, margins, sizing, and background. You may wish to remove the background in order to minimise variance and file size.
You can process images yourself following this DIY Photoshop guide, or use a service like Pixelz that offers a free trial and 24 hour or less turnaround.
Do you have any questions about using product images in listings? Do you have favorite angles, or post-production techniques? Let us know in the comments below!
ist Business Development Manager Germany bei Sage Pay. Er verfügt über langjährige Erfahrungen in der Finanzbranche mit Schwerpunkt auf den bargeldlosen Zahlungsverkehr. Seine Karriere begann er bei der Eurocard Service GmbH, wo er schnell zum projektverantwortlichen Key Account Manager aufstieg. Als Business Development Manager bei First Data International im Bereich Mobile Solutions entwickelte und vermarktete er neue Zahlungsmethoden. Er machte sich auch einen Namen als freier Berater für Banken, Zahlungsanbieter oder Kartenorganisationen und begleitete Projekte, welche die Zahlungsfunktionalitäten am POS, im E- und M-Commerce unterstützten.


Leave a Reply
Want to join the discussion?Feel free to contribute!