Facebook pixel: How to use the free online marketing tool for your ePages Now online shop
You can now easily activate the Facebook pixel in your online shop. This marketing tool allows you to extensively monitor the activities that take place in your online shop and create precise social media campaigns by narrowing down target groups. In this article, we show you how to integrate the pixel in ePages Now and work with it. We also talked to the german merchant Andreas Semmer from “Whisky Experience”, who tested the integration for us.
According to a study by Forrester, 55% of all European retail sales are influenced by digital interactions. Many successful brands are aware of this and already invest their marketing budget in branding via social media platforms, especially Facebook and Instagram. One value is the enormous reach. Furthermore, social media campaigns can be easily targeted to specific audiences.
What is the Facebook pixel?
With the Facebook pixel you can record user reactions in your online shop. Therefore, you have access to large data sets that help you get an overview of your customers’ journey. In a second step, you can use this data to optimise advertising campaigns via social media (for example Facebook or Instagram).
Creating a Facebook pixel
You can edit and view Pixel data via the free Facebook Business platform. In order to use this service, make sure that your Facebook account is linked to Facebook Business.
Visit Facebook Business Manager to log in with the Facebook account you also use to manage the Facebook page of your business. If necessary, use a private tab (incognito mode) to prevent auto-filling of the wrong login data.
Select your desired pixel or create a new pixel under Settings > Data Sources > Pixel > Add. All pixels can be found under Facebook Business > Events Manager. If you are already signed in to other Facebook Business tools, you can find Events Manager under Other Tools. If you have multiple websites or shops, it makes sense to create multiple pixels.
How to configure the pixel in Facebook Business
Before you integrate a pixel into your online store, you need to create and configure it through Facebook Business. To do this, go to Facebook Business > Events Manager to set up all your tracking settings.
Step 1: Add events
Events allow you to define specific user responses that will be recorded in the online store. The View Content event is preset. This tracks every click on a product or category page. Other standard events can be defined by clicking on the buttons. Some example events are
- Add to cart. The customer adds product(s) to the shopping cart.
- Initiate checkout. The customer has started the checkout.
- Purchase. The purchase is completed.
- Add payment info. The customer is in the checkout process.
- Add to wish list. A customer adds product(s) to the wish list.
- Lead/Complete registration. Registration (for example for a customer account) is completed.
- Contact. A customer establishes contact (for example via the contact form).
- Search. The customer searches for something via the search field.
To add events to your pixel, you can work with the Event Setup Tool. To do this, in your desired pixel, select Add Events > From Pixel > Open Event Setup Tool.
Once you have opened the tool, you can see directly which buttons you can track with your pixel. In this help article from Facebook, you can learn more about the settings in the event set-up tool.
Step 2: Generate code snippet
Once you have created all the events you want for your pixel, generate the code snippets using the Google Tag Manager. These code snippets can then be integrated into the Now Shop. If you have not yet integrated Google Tag Manager into your store, please see our help centre article for more details.
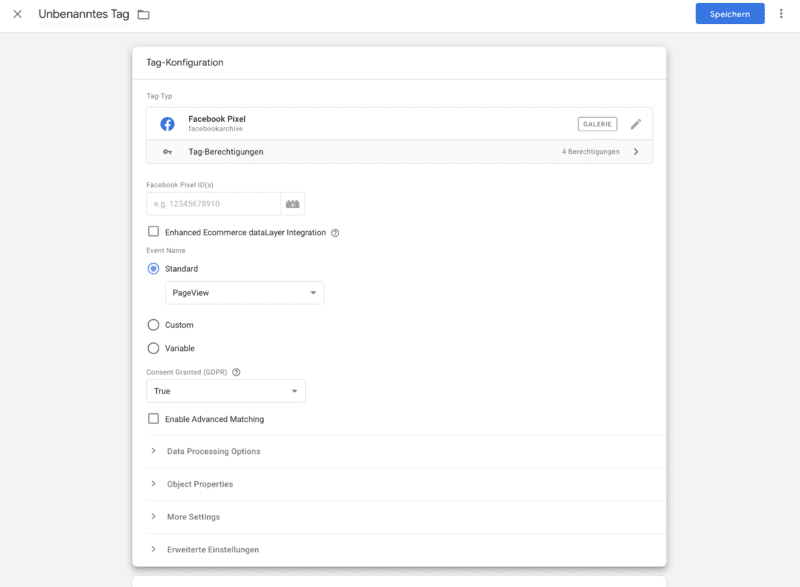
In your Google Tag Manager account, click Overview > Add a new tag. In the tag configuration you will find the tag type ‘Facebook Pixel’. Tip: If you can’t find Facebook Pixel in the search results, take a look at the community templates. Add “Facebook Pixel” and enter the ID of your configured pixel and save:

Now you can copy the code snippet for your store. You can find it in the Tag Manager overview under Admin > Install Google Tag Manager. Copy the <head> and <body> sections separately.
Step 3: Link Pixel to the Now Shop
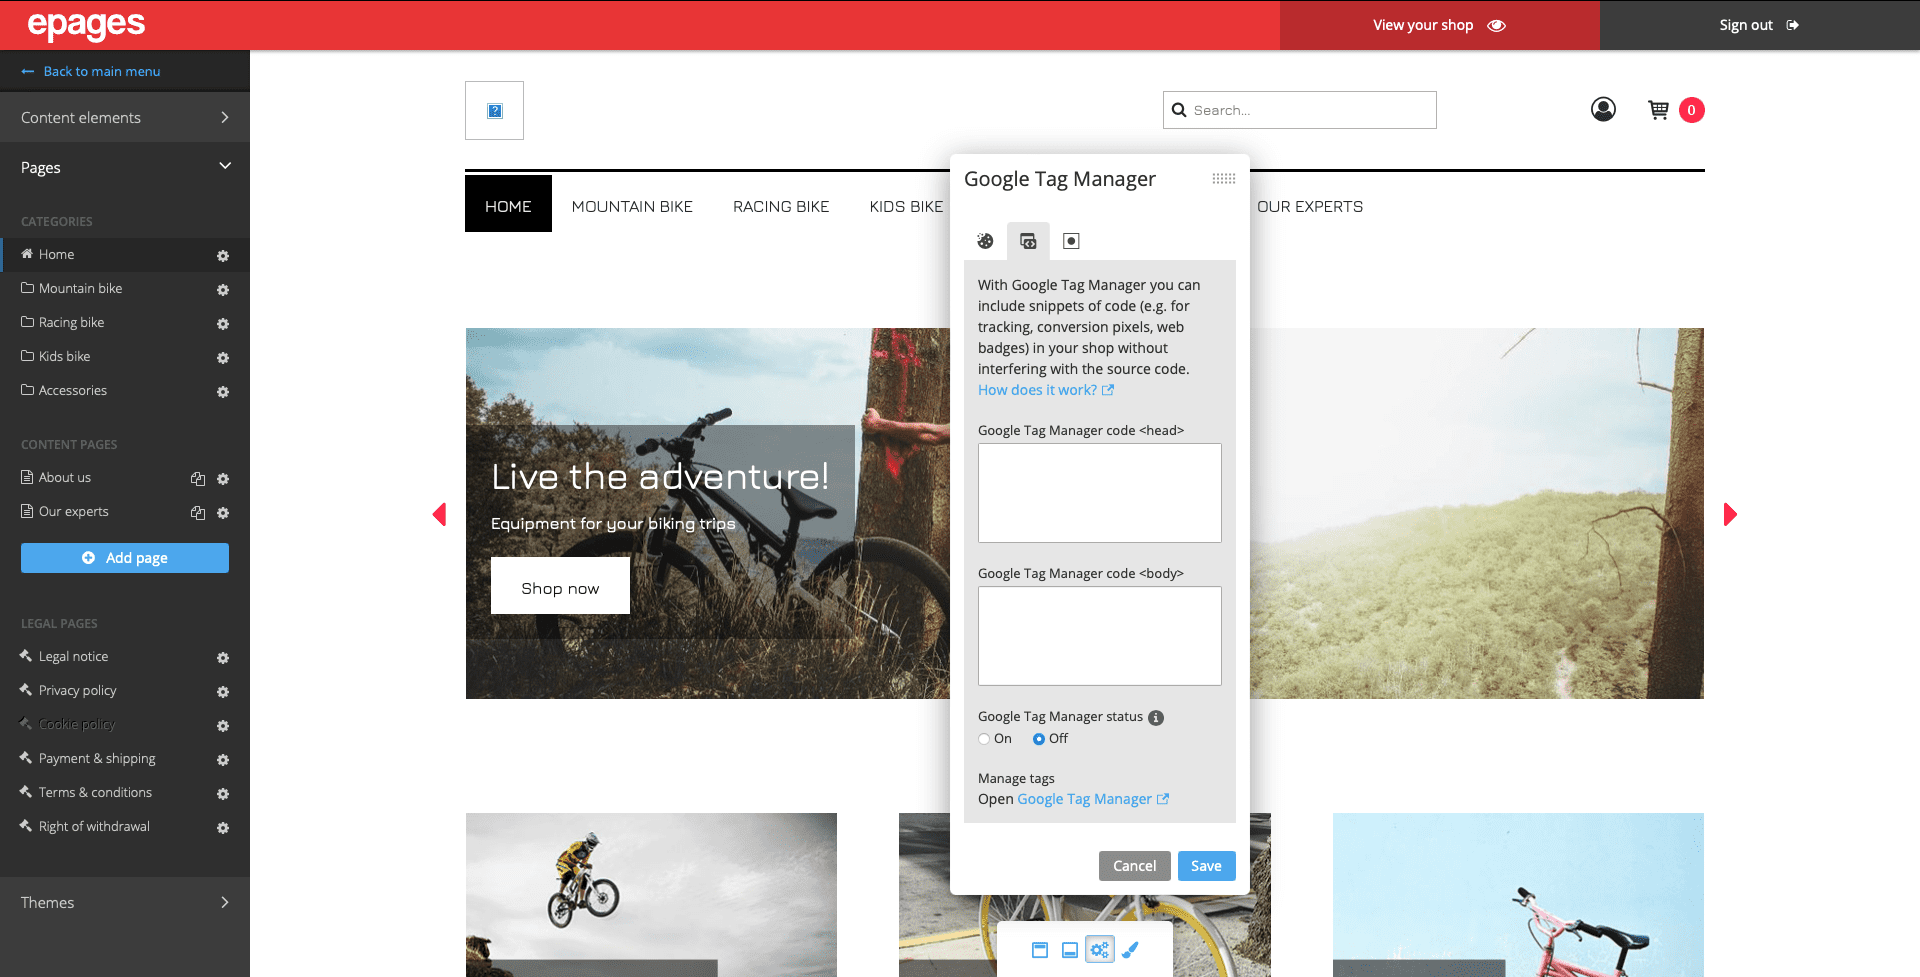
The code snippet is integrated into your ePages Now shop via the Google Tag Manager integration. Click on Editor in the administration area of your shop. In the action bar at the bottom of the live preview, you can access the Google Tag Manager via the cogwheel icon:

Here you can insert the corresponding code snippets for the <head> and <body> area. The events you create will then be automatically tracked in your online shop. You can read more information about code snippets via the Google Tag Manager in our help centre.
Note that you need to adjust your privacy policy in the editor to refer to the collection of data. Movements in the online shop can only be measured for visitors who have accepted all cookies. With the help of tools such as the free legal service from Trusted Shops, these adjustments can be made easily.
Measure performance and place targeted advertising
On the start page, you will see an overview of all activities in your shop that have been measured with the pixel:
Go to a desired event and click View details to see more detailed data.
The pixel data offers you new possibilities to optimise your advertising campaigns (for example on Facebook or Instagram) to boost your sales. You set up these ads via another Facebook Business tool: The Ad Manager.
To do this, Facebook uses the pixel data in order to condense information about your target group and display the ads to similar accounts.
You can also define individual target groups for advertising campaigns based on pixel events. This is helpful for retargeting, for example. With this method, you can address people who already know your shop and have shown interest in the past. For instance, you can narrow down the target group as follows:
- Visitors who have placed products in their shopping cart in the last 180 days without completing the purchase
- Visitors who have not visited your shop for more than 180 days
- Visitors who have recently added products to your wish list
You can also select one of your events as a conversion to define the goal of the campaign (for example, the “purchase” event).
For step-by-step instructions on how to create custom audiences using pixel events, visit this help article from Facebook.
Testimonial: Andreas Semmer from Whisky Experience
The German spirits retailer Andreas Semmer has been operating his ePages Now shop Whisky Erlebnis (Whisky Experience) since three years. He also presents his selection of exclusive whiskies and other liquors as well as extensive accessories on social media. He tested the new Pixel integration for one week to share his experiences with us.
Did you already have experience with tracking data before the Pixel?
Andreas Semmer: So far, I have been tracking my online shop via Google Analytics, at least as far as a rough overview of clicks is concerned. From time to time, I have promoted articles directly via Facebook and then checked the reports on the reach and interactions. In the past, we mainly focused on the German target group because we only deliver within Germany.
Which new functionalities are relevant for your online shop?
Andreas Semmer: As far as the sale of whisky is concerned, novelties and special offers are particularly interesting. For each of these, I created a page in my online shop whose number of visitors I now specifically see via URL tracking with the pixel.
On the other hand, I use the tracking of buttons to see exactly where my customers abandon the page. To do this, I look at the number of clicks on the shopping cart all the way through to the payment process.
Also, by tracking the wish list button, I see for the first time how many customers use a wish list for my products. This gives me new insights, which I can incorporate into my next promotion. In summary, I simply get direct and detailed feedback on the question: what brings me forward in terms of sales?
How did the activation of the pixel in your online shop go?
Andreas Semmer: The insertion of the pixel into the shop went smoothly. As usual, the process was simple and well described; it is ePages (laughs).
How did the set-up in the Facebook Business Manager go?
Andreas Semmer: You should factor about two to three hours of work with the Facebook Business Manager. Facebook offers many options; I first had to familiarise myself with these. Especially if you, like me, don’t have much experience working with Facebook tools. You also have to think about which events you want to track in your online shop. If you are aware of these points, the tool offers detailed and useful tracking possibilities.
What is your conclusion about the Facebook pixel?
Andreas Semmer: In the near future, I will definitely use the Pixel to promote a paid ad on Facebook. Through the pixel, I can generate reports on how many customers have put products in the shopping basket or put something on the wish list. This way, you can simply optimise your advertising and tailor your offer for these customers. I’ll just try out which content is particularly well received. With the pixel, you have immediate and detailed feedback on how many people click on the product or start the purchase process. I find that very interesting.
Als Content Manager bei ePages ist Sarah für redaktionelle Inhalte und Videocontent zuständig. Im ePages-Blogstellt sie Onlinehändlern Marketingtipps, rechtliche Updates und Infos zur ePages-Software zur Verfügung, um ihnen den Einstieg in den E-Commerce zu erleichtern.


Leave a Reply
Want to join the discussion?Feel free to contribute!