New features of ePages Now: Customer groups, Facebook Pixel and more
Our development teams are constantly working on improving your shop and developing new features. In this article, we will introduce you some of the latest features in ePages Now. Find out below how you can define customer groups and offer customer-specific prices in your shop as well as how you can connect a Facebook Pixel to it to track user activities and create targeted advertising campaigns.
Set customer groups and customer-specific prices
Customer groups allow you to categorise types of customers such as regular customers or resellers. You can then use the categorisation to set customer-specific prices for your products.
What are my customer groups?
Each shop has different types of customers. One of these are resellers who buy from your shop. If you have negotiated a special price with these customers (perhaps for certain products), you can use customer grouping to display individualised prices in the shop. If you have negotiated different conditions with additional resellers, you can create a customer group per reseller so that each reseller is shown individual prices. On the other hand, there may be regular customers. For example, if you want to offer a special price to loyal customers, you can organise those customers into one customer group.
Step 1: Create customer groups
You can create a new customer group in your shop’s administration area under Customers > Customer groups. There, you can see and manage all your customer groups. Click Add to create a new group. Enter a name for the group there and then click Add again to confirm the group.
Step 2: Add customers to a customer group
To add customers to your customer groups, go to Customers in your administration area. There, click on the customers you want to add to the group. Under Customer Groups you can then select the group to which the customers are to be added.
Step 3: Set customer-specific prices
Once you have created your customer groups, you can define scale prices specifically for these customer groups.
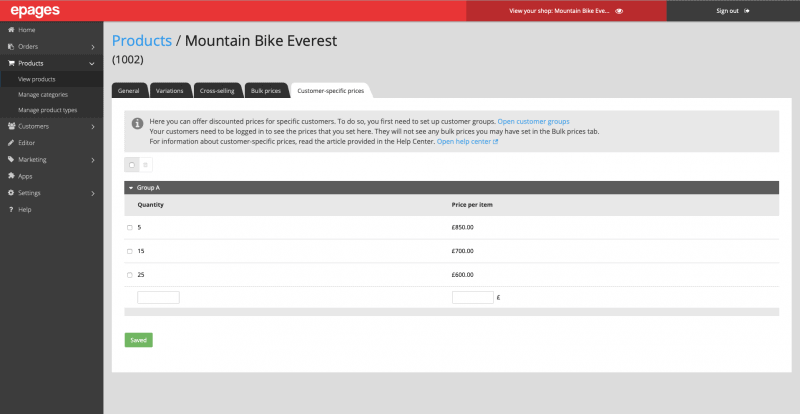
To set customer-specific prices, go to Products and View products in your administration area and select a product. Under the tab Customer-specific prices you can define the price. This can be done via the number of units and the unit price:
In the future, you will also be able to set percentage and shopping basket discounts.
Now, once your customers have logged in with their customer account, they can see the prices set for them and purchase the products accordingly. This way, you can also process large order volumes from your resellers through your online shop.
Connecting the Facebook Pixel to your shop
The Facebook Pixel is a free tracking tool that gathers data from your online shop.
Upon activating the Facebook Pixel in your shop, you can use this data for social media advertising and optimise campaigns. The insights generated through the Facebook Pixel may help you get a better overview of the customer journey in your shop.
How can I integrate the pixel?
With the new integration, the pixel can be activated into your shop in three steps.
- Facebook: Create a Facebook pixel with your Facebook Business account. To do this, go to Business Settings > Data Sources on Facebook. If you don’t have a Facebook Business account yet, you can create one for free.
- Now shop: Connect your Facebook Business account with your shop. In the administration area under Marketing > Facebook you will see the button “Connect”. Log in with your Facebook Business account.
- Now Shop: Your created pixels from the Facebook Business account will be displayed automatically. Confirm the Facebook pixel you want to connect to your shop. Save.
Upon integrating the pixel to your shop, you can track the movements of your visitors via so-called events. You can view and manage the data in the Facebook Business Manager.
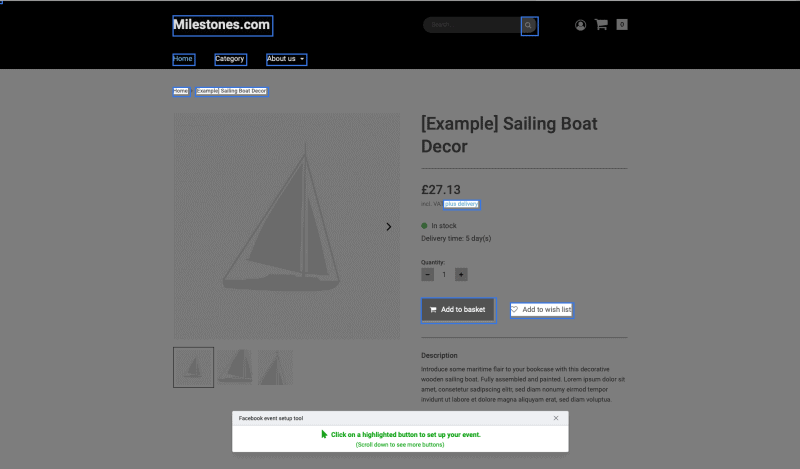
You can either track certain URLs or buttons in your online shop, for example the “Add to cart” button. If a visitor clicks on this button, you will see this in the evaluation in the Events Manager tool in the Facebook Business Manager. Other events can be:
- Add to shopping cart. The customer adds product(s) to the shopping cart.
- Start checkout. The customer has started the checkout.
- Purchase. The purchase is completed.
- Add payment information. The customer is in the checkout process.
- Add to wish list. A customer adds product(s) to the wish list.
- Lead/complete registration. Registration (for example for a customer account) is completed.
- Contact. A customer makes contact (for example via the contact form).
- Search. The customer searches for something via the search field.
With this pixel information, data from your target group will be gathered automatically. If you then place an ad on Facebook or Instagram, valuable information is available about to whom the ad should be shown to. You can further specify the target group by, for example, displaying an ad on Facebook or Instagram only to people who have visited your shop in the last 180 days but have not bought anything. This online marketing procedure is called retargeting.
You can find out more about the Facebook Pixel and read our merchant testimonial in this blog article.
ist Product Owner bei ePages.


Leave a Reply
Want to join the discussion?Feel free to contribute!