How do I use natural window light for product photography?
Product photography doesn’t have to mean a big budget. Natural sunlight from a window can be a great light source, so long as you follow the right do-it-yourself product photography best practices. Learn more in our guest article by Thomas Kragelund from Pixelz.
The importance of product images to e-commerce is nearly impossible to overstate. Online shopping is a visual experience, and your customer will equate the quality of your imagery with the quality of your product.
You can create high quality product photography for your online store without breaking the bank. There are several do-it-yourself techniques you can master to save time and money while optimizing your online store.
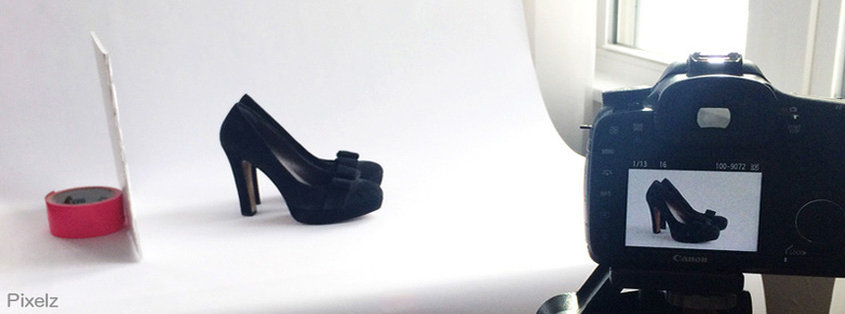
A simple and cost-effective DIY setup for product photography with natural window light.
Your window should be large enough to fully light your product in a room that doesn’t cramp your overall DIY studio setup. You need enough room to set up your equipment safely and move around comfortably.
The window light should come into your room at a 90-degree angle to your product. If the light is too direct and harsh, or uneven, try diffusing it. You can hang a sheer white curtain over the window to soften the light and distribute it evenly onto your product.
Use a roll of seamless white paper as a backdrop, and a white foam core board for fill light.
Use a white background for your product that’s large enough to fill the frame of your shot. There are many cost-effective backdrop options shared by both DIY and professional photographers, like a seamless roll of white paper (one $38 option: Savage Seamless Background Paper, 53″ wide x 12 yards, Super White). You can also use a clean white sheet, plain white walls, or large white foam board.
Prep your product and place it on or in front of your chosen backdrop and directly in front of your camera. If you don’t have great light, or if you’re shooting a dark object, use a white foam board to provide fill light.
Pictures taken without fill light (left) and with fill light (right)
“Fill light” is reflected light that helps evenly light a product, preventing shadows and illuminating detail. Cut a piece of foam core board (one $8.99 option: 24X36 1/8″ White Foam Core Backings) about the same size as your product, and stand it straight up next to your product. It should be on the opposite side of your product from the window, directly facing the window, so it reflects the most possible light.
Position your camera on a tripod directly facing your product, with legs adjusted so that it’s level with your product. The camera frame should be mostly filled by your product, with a little bit of extra space around the subject. Set a full focus aperture, follow our DIY camera settings guide, and start shooting!
You’re on the right track if you have more questions
There’s not a single answer to the question you’re really asking: how do I create perfect product images for my store?
Every business is different, and so too are the solutions. You might want to outsource photography from beginning to end, do it all yourself, or take a blended approach. If you’re here, though, you’re on the right track. Preparation, awareness, and a methodical approach to photography and post-production will serve you well.
Each photoshoot is not just an end in itself, but preparation for your next shoot. Educate, experiment, adjust, and don’t forget to have fun!
ist Business Development Manager Germany bei Sage Pay. Er verfügt über langjährige Erfahrungen in der Finanzbranche mit Schwerpunkt auf den bargeldlosen Zahlungsverkehr. Seine Karriere begann er bei der Eurocard Service GmbH, wo er schnell zum projektverantwortlichen Key Account Manager aufstieg. Als Business Development Manager bei First Data International im Bereich Mobile Solutions entwickelte und vermarktete er neue Zahlungsmethoden. Er machte sich auch einen Namen als freier Berater für Banken, Zahlungsanbieter oder Kartenorganisationen und begleitete Projekte, welche die Zahlungsfunktionalitäten am POS, im E- und M-Commerce unterstützten.


Leave a Reply
Want to join the discussion?Feel free to contribute!